Introduction
This article describes how developers can configure and send custom email notifications. Custom email notifications may be useful if you want to send messages upon certain events.
For the sake of example, we will create a page in X-Cart's admin area, where you can send a message to given email address.
Preparation: creating module, page and form
We start off with creating a new module with the developer ID XCExample and the module ID EmailDemo.
Then, we create a page admin.php?target=example_email_demo in admin area. For that we create:
Controller class
\XLite\Module\XCExample\EmailDemo\Controller\Admin\ExampleEmailDemowith the following content:<?php
namespace XLite\Module\XCExample\EmailDemo\Controller\Admin;
/**
* ExampleEmailDemo
*/
class ExampleEmailDemo extends \XLite\Controller\Admin\AAdmin
{
}Page viewer class
\XLite\Module\XCExample\EmailDemo\View\Page\Admin\ExampleEmailDemowith the following content:<?php
namespace XLite\Module\XCExample\EmailDemo\View\Page\Admin;
/**
* ExampleEmailDemoPage
*
* @ListChild (list="admin.center", zone="admin")
*/
class ExampleEmailDemo extends \XLite\View\AView
{
/**
* Return list of allowed targets
*/
public static function getAllowedTargets()
{
return array_merge(parent::getAllowedTargets(), array('example_email_demo'));
}
/**
* Return widget default template
*/
public function getDefaultTemplate()
{
return 'modules/XCExample/EmailDemo/page/example_email_demo/body.twig';
}
}Empty page template
skins/admin/modules/XCExample/EmailDemo/page/example_email_demo/body.twig.
Then, we display from that contains two fields: 'Email to' and 'Body' on this page.
We create form widget's class
\XLite\Module\XCExample\EmailDemo\View\Model\EmailDemowith the following content:<?php
namespace XLite\Module\XCExample\EmailDemo\View\Model;
class EmailDemo extends \XLite\View\Model\AModel
{
protected $schemaDefault = [
'to' => [
self::SCHEMA_CLASS => 'XLite\View\FormField\Input\Text\Email',
self::SCHEMA_LABEL => 'Email to',
self::SCHEMA_REQUIRED => true,
],
'body' => [
self::SCHEMA_CLASS => 'XLite\View\FormField\Input\Text',
self::SCHEMA_LABEL => 'Body',
self::SCHEMA_REQUIRED => false,
],
];
protected function getDefaultModelObject()
{
return null;
}
protected function getFormClass()
{
return 'XLite\Module\XCExample\EmailDemo\View\Form\EmailDemo';
}
}We create
\XLite\Module\XCExample\EmailDemo\View\Form\EmailDemoform class used bygetFormClass()method:<?php
namespace XLite\Module\XCExample\EmailDemo\View\Form;
class EmailDemo extends \XLite\View\Form\AForm
{
protected function getDefaultTarget()
{
return 'example_email_demo';
}
protected function getDefaultAction()
{
return 'send';
}
}We update the
skins/admin/modules/XCExample/EmailDemo/page/example_email_demo/body.twigtemplate and define its content as follows:<h2>Email sending script</h2>
{{ widget('\\XLite\\Module\\XCExample\\EmailDemo\\View\\Model\\EmailDemo') }}
At this point, we have a module and the form on the admin.php?target=example_email_demo page:
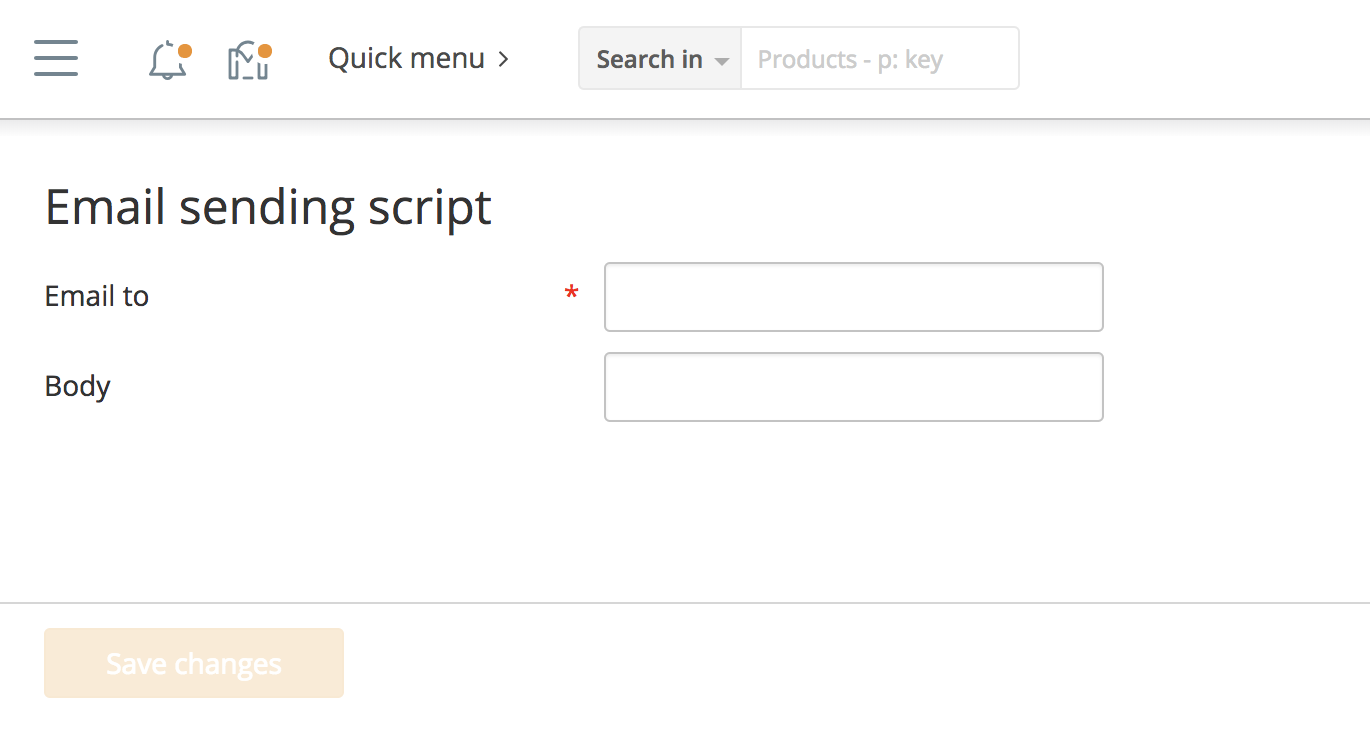
The form can be submitted, but it will not produce any result.
Sending email
All X-Cart notifications are sent via \XLite\Core\Mailer class. The main method for sending notifications is \XLite\Core\Mailer::compose(). Here is the list of parameters it accepts:
- string $type - defines the type of notification and it can be used to pre-process the
$to,$from,$dirand$customHeadersparameters. You can create a set of methods with names likeprepare<param><type>(), e.g. , if$typeis 'DemoMail', they can beprepareCustomHeadersDemoMail($customHeaders)orprepareToDemoMail($to)methods and those methods will be called automatically during message composing. - string $from - email's From field.
- string $to - email's To field.
- string $dir - directory where mail templates are located. The parent folders for this directory is
<X-Cart>/skins/mail/admin,<X-Cart>/skins/mail/customeror<X-Cart>/skins/mail/commondepending on whether you send an email to admin or customer. Such directory must containsubject.twigtemplate that defines email's subject andbody.twigone that defines email's text. - (optional) array $customHeaders - an array of key-value pairs with additional headers (Cc, Bcc, Reply-To, etc).
- (optional) boolean $doSend - flag to cancel sending; can be used to debug the mailer.
- (optional) string $interface (default: customer) - template interface, either
\XLite::ADMIN_INTERFACEor\XLite::CUSTOMER_INTERFACE. Depending on this parameter, X-Cart will look templates either in<X-Cart>/skins/mail/admin/$diror in<X-Cart>/skins/mail/customer/$dirdirectory. If it cannot find templates there, it will look for them in<X-Cart>/skins/mail/common/$dirone. - (optional) string $languageCode - language code of the message.
- (optional) bolean $force flag. If the notification is not enabled in admin area, it will still be sent if this parameter is
true.
We are going to create our own method that will call this compose() method, but with our parameters, so we have to decorate \XLite\Core\Mailer class. We create classes/XLite/Module/XCExample/EmailDemo/Core/Mailer.php file with the following content:
<?php

namespace XLite\Module\XCExample\EmailDemo\Core;

/**
 * Mailer core class
 */
abstract class Mailer extends \XLite\Core\Mailer implements \XLite\Base\IDecorator
{
    public static function sendEmailDemoMessage($to, $body = '')
    {
        static::register([
            'subject' => 'Demo notification',
            'body' => $body,
        ]);

        static::compose(
            'DemoMail',
            static::getSiteAdministratorMail(),
            $to,
            'modules/XCExample/EmailDemo/message',
            array(),
            true,
            \XLite::CUSTOMER_INTERFACE
        );

        return static::getMailer()->getLastError();
    }
}
This sendEmailDemoMessage() method is the one we will be using. Make sure you define this method as static and it has unique name as all modules add methods for sending notifications to \XLite\Core\Mailer class. The method accepts two parameters: recepient's address and text for notifcation.
When we call this static::register() method inside, it registers variables that will be available in email notification templates:
- 'subject' variable will always have value of 'Demo notification' and it can be accessed as
this.subjectin templates; - 'body' variable will have value of
$bodyvariable passed to the method. Similarly, it can be accessed asthis.bodyin templates.
After that we just call already known compose() method:
static::compose(
    'DemoMail',
    static::getSiteAdministratorMail(),
    $to,
    'modules/XCExample/EmailDemo/message',
    array(),
    true,
    \XLite::CUSTOMER_INTERFACE
);
$type = 'DemoMail', we just have to specify some sort of type for this notification.$from = static::getSiteAdministratorMail(), so all such notifications will be sent from site's admin email. You can also use pre-defined methods such asstatic::getSupportDepartmentMail(),static::getUsersDepartmentMail()orstatic::getOrdersDepartmentMail()which reflect emails specified in 'Store setup > Contact information > Contacts' section in admin area.$toparameter is defined as$tovariable passed into this method.$dir = 'modules/XCExample/EmailDemo/message', which means that X-Cart will look for templates for this notification inskins/mail/customer/modules/XCExample/EmailDemo/messagedirectory (since 7th parameter is defined as \XLite::CUSTOMER_INTERFACE) or inskins/mail/common/modules/XCExample/EmailDemo/messageone. We will have to create those templates as a next step.$customHeaders = array(), which means that we do not define any custom headers.$doSend = true, which means that this message will indeed be sent.interface = \XLite::CUSTOMER_INTERFACE, which means that this is a notification to customers, so we look for templates inskins/mail/customer/modules/XCExample/EmailDemo/messagedirectory as well as define customer options for this notificaiton in admin area. More about it later in the article.
After we send a message, we return mailer's last error static::getMailer()->getLastError(). If everything is OK, it will return null.
Next step is to create templates that will be used by email sending process. We will put our templates into <X-Cart>/skins/mail/common folder, because they will work for both admin and customer interfaces. So, we create skins/mail/common/modules/XCExample/EmailDemo/message directory and put two templates into it:
subject.twig
{{ this.subject }}
body.twig
<p>
  Text: {{ this.body }}
</p>
As you can see, we use {{ this.subject }} and {{ this.body }} variables defined earlier.
We already have properly working email sending method and now we need to call it. It will be called from inside controller that handles submitted form we created earlier. Let us create such controller's method.
For that we edit our \XLite\Module\XCExample\EmailDemo\Controller\Admin\ExampleEmailDemo class and add the following method there:
protected function doActionSend()
{
    $request = \XLite\Core\Request::getInstance();

    $error = \XLite\Core\Mailer::sendEmailDemoMessage(
        $request->to,
        $request->body
    );

    if (!is_null($error)) {
        \XLite\Core\TopMessage::getInstance()->addError('Error of test e-mail sending: ' . $error);
    } else {
        \XLite\Core\TopMessage::getInstance()->add('Test e-mail has been successfully sent');
    }

    $this->setReturnURL(
        $this->buildURL('example_email_demo', '', array())
    );
}
This doActionSend() method will be called when you submit a request with 'action=send' parameter, which will happen when we submit a form. In this case, we pull 'to' and 'body' parameters from the request and then call the \XLite\Core\Mailer::sendEmailDemoMessage() method with them:
$request = \XLite\Core\Request::getInstance();

$error = \XLite\Core\Mailer::sendEmailDemoMessage(
    $request->to,
    $request->body
);
If there is an error while sending email notification, we will display it, otherwise we will display 'Test e-mail has been successfully sent' message:
if (!is_null($error)) {
    \XLite\Core\TopMessage::getInstance()->addError('Error of test e-mail sending: ' . $error);
} else {
    \XLite\Core\TopMessage::getInstance()->add('Test e-mail has been successfully sent');
}
After that we redirect a user to the same page:
$this->setReturnURL(
    $this->buildURL('example_email_demo', '', array())
);
After we have done all that, we can go to our admin.php?target=example_email_demo page and send an email from there. Just specify recepient's email and text for the message. However, usually all email notifications are registered in the system, so that you can edit their subject and main part from admin's interface, rather than editing the template.
Let us register our message in X-Cart, so we could do that as well.
Registering the notification
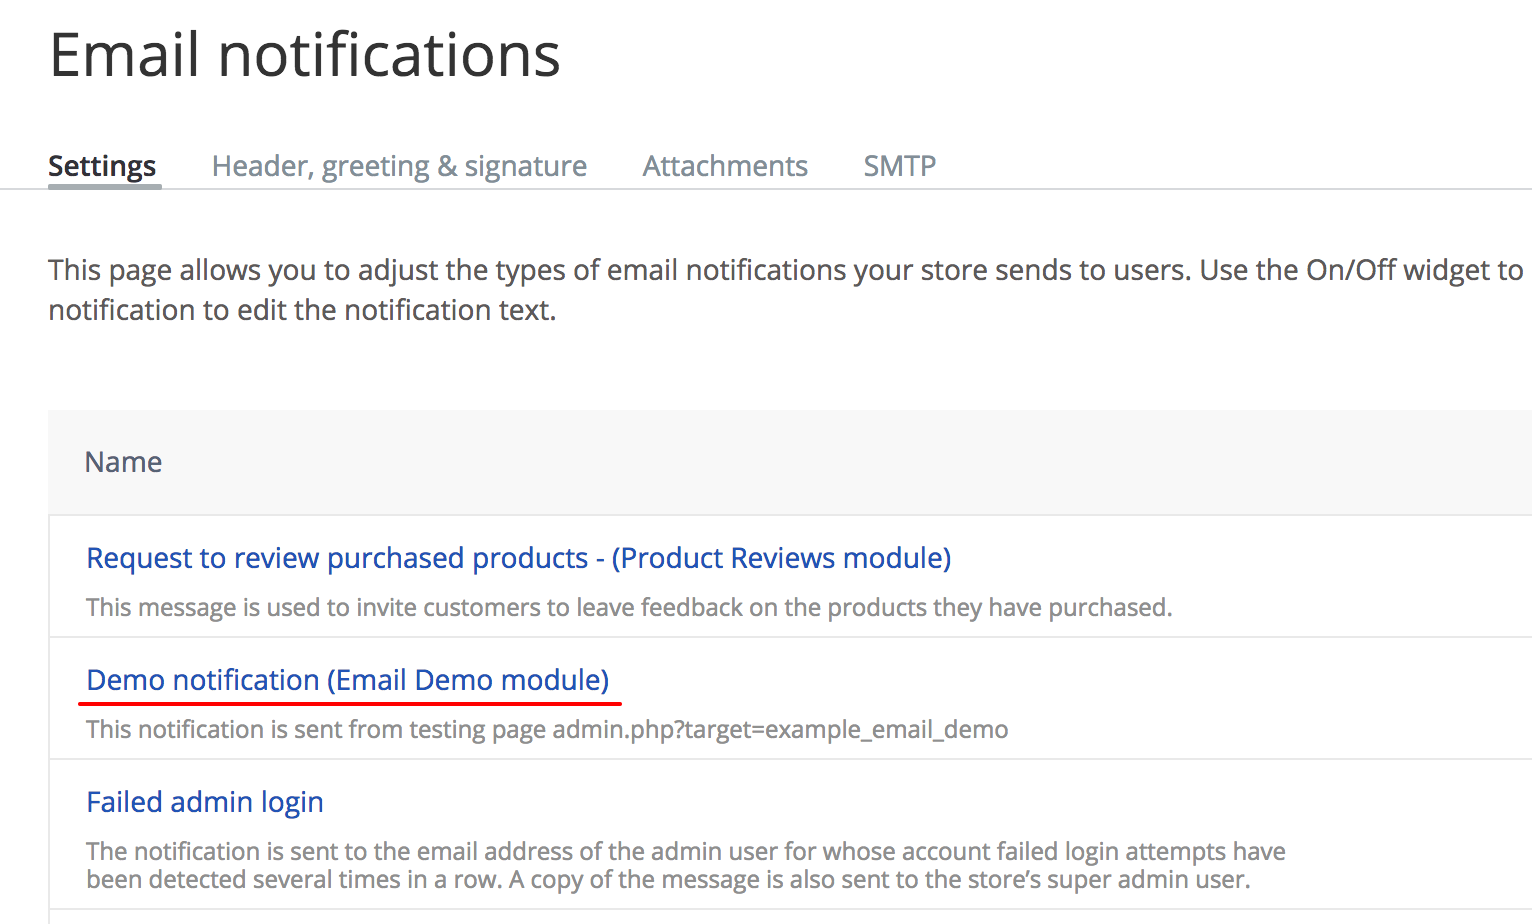
The admin area of an X-Cart store allows you to manage email notifcations. You can configure them in the 'Store setup > Email notifications > Settings' section in admin area. This page contains a list of different notification types and provides switches allowing the admin to enable/disable specific notification types for administrators or customers. For a custom notification to appear in the aforementioned list, it should be registered by special code in module's install.yaml file. Here is the content of our classes/XLite/Module/XCExample/EmailDemo/install.yaml file:
XLite\Model\Notification:
  - templatesDirectory: modules/XCExample/EmailDemo/message
    availableForAdmin: false
    availableForCustomer: true
    enabledForAdmin: false
    enabledForCustomer: true
    translations:
      - code: en
        name: Demo notification (Email Demo module)
        description: This notification is sent from testing page admin.php?target=example_email_demo
        customerSubject: Demo notification
        customerText: Body of demo notification
Let us walk through what we are doing in this file:
XLite\Model\Notification:says that we are registering an email notification;-says that now will go details of this email notification;templatesDirectory: modules/XCExample/EmailDemo/messagesays that below details will be applied to the notification defined bymodules/XCExample/EmailDemo/messagefolder (our notification);availableForAdminandavailableForCustomeroptions define whether such notification can be sent to admin or customer users. In our case, we can send it to customers, but we cannot send it to admins. One notification can also be sent to admins and customers at the same. This option defines the following selectors in 'Store setup > Email notifications > Settings' section: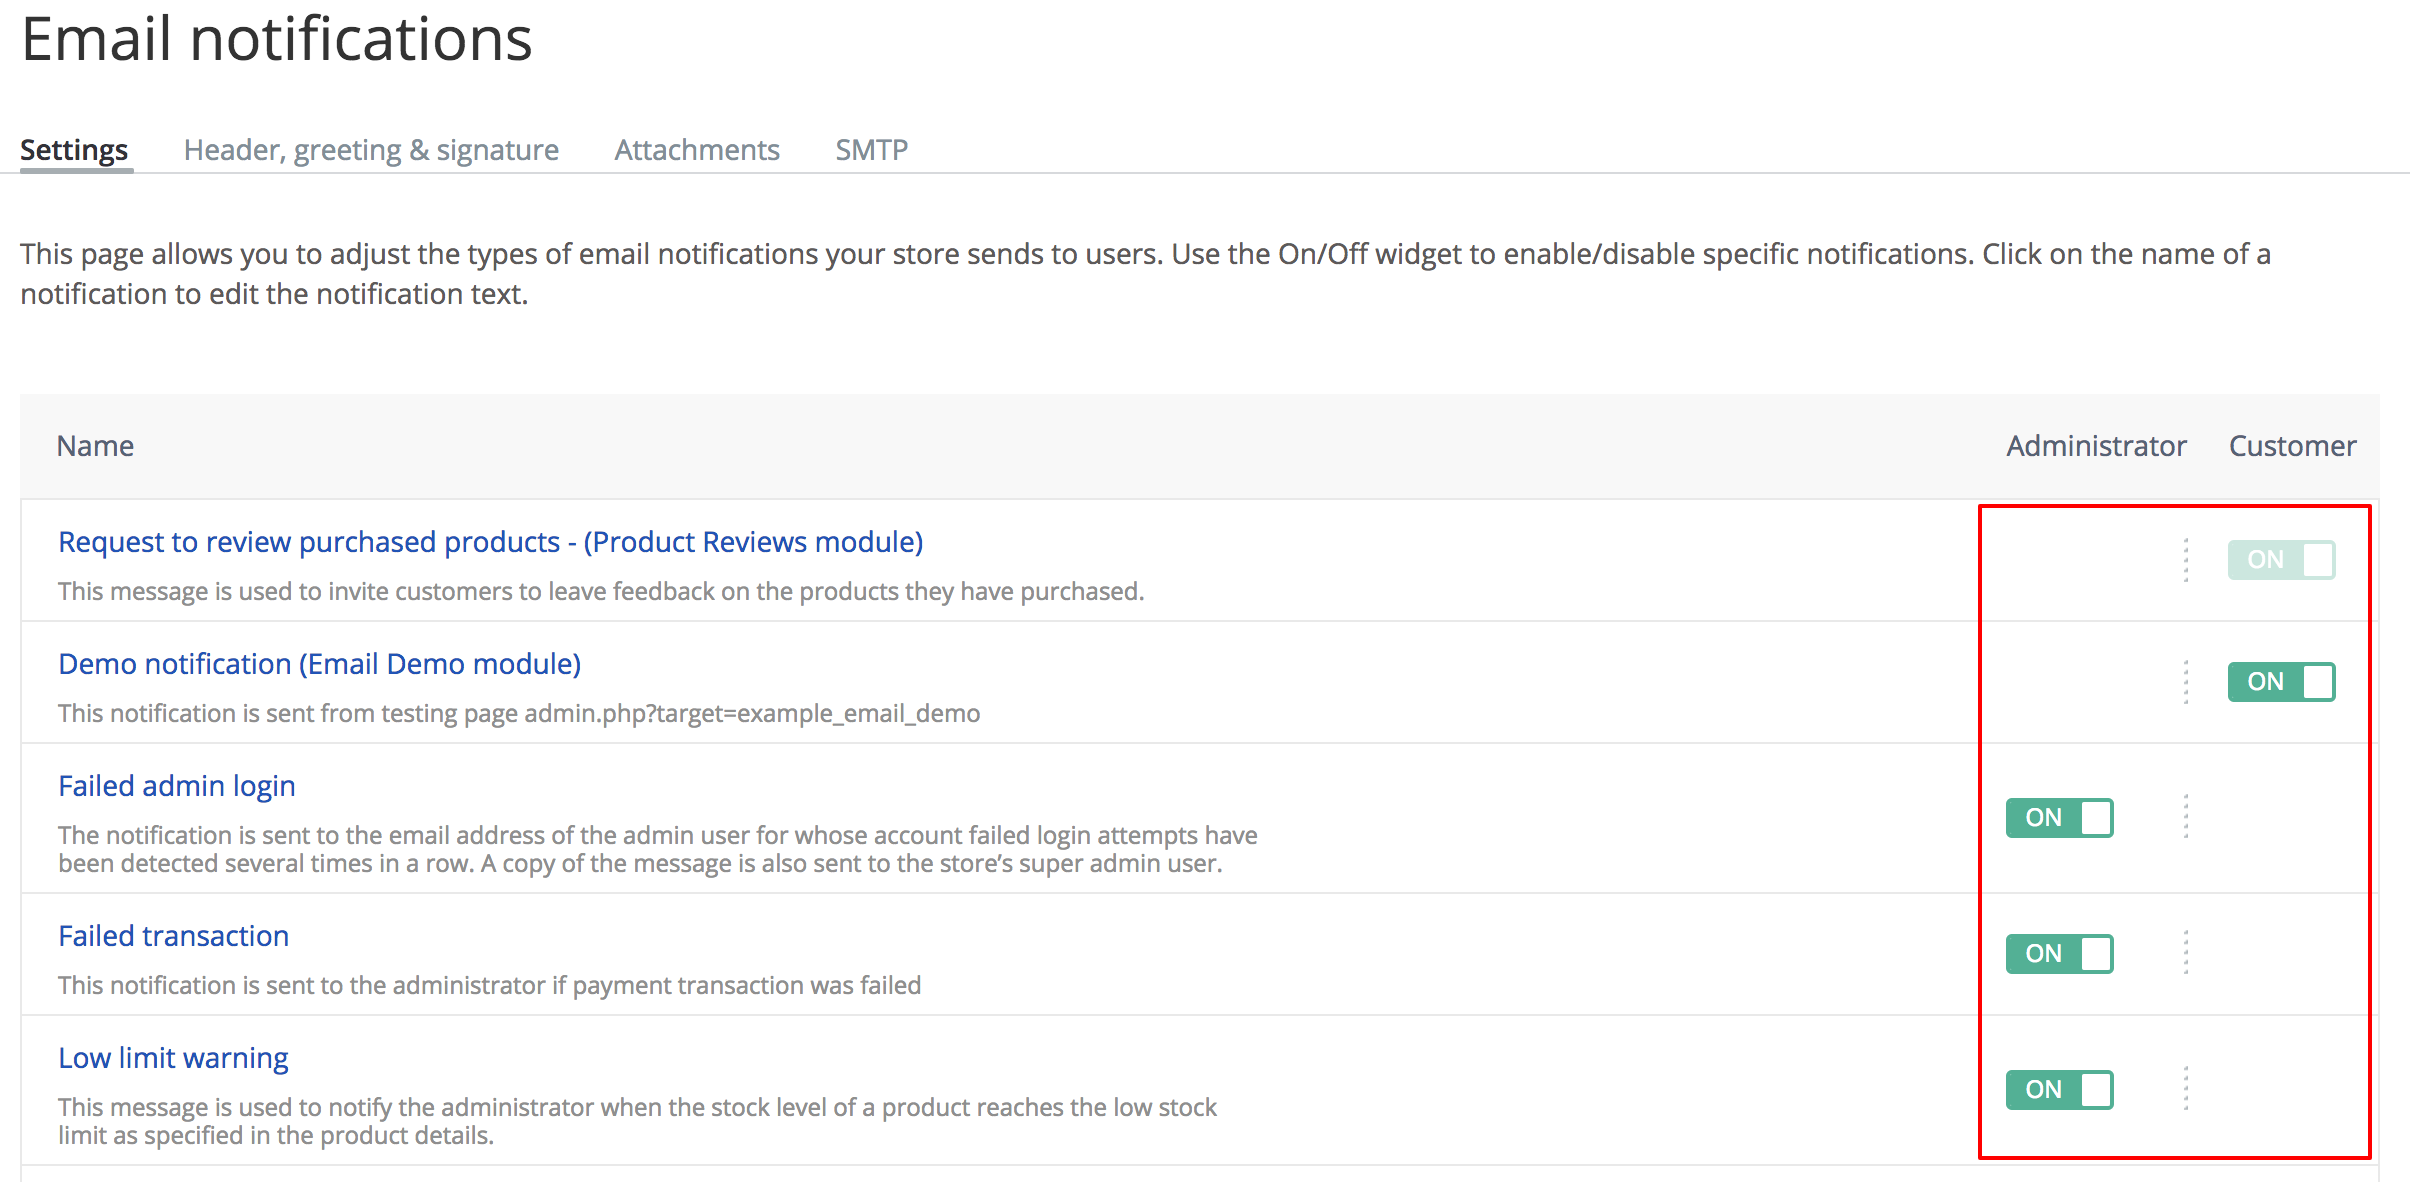
enabledForAdminandenabledForCustomeroptions define whether this notification is enabled for customers and admins. It is enabled for customers and disabled for admins;translations:section defines that below will be defined multi-language components of the notification;- code: enline defines that below will be multi-language values for English language;name: Demo notification (Email Demo module)defines the name of the notification when displayed in the notification list: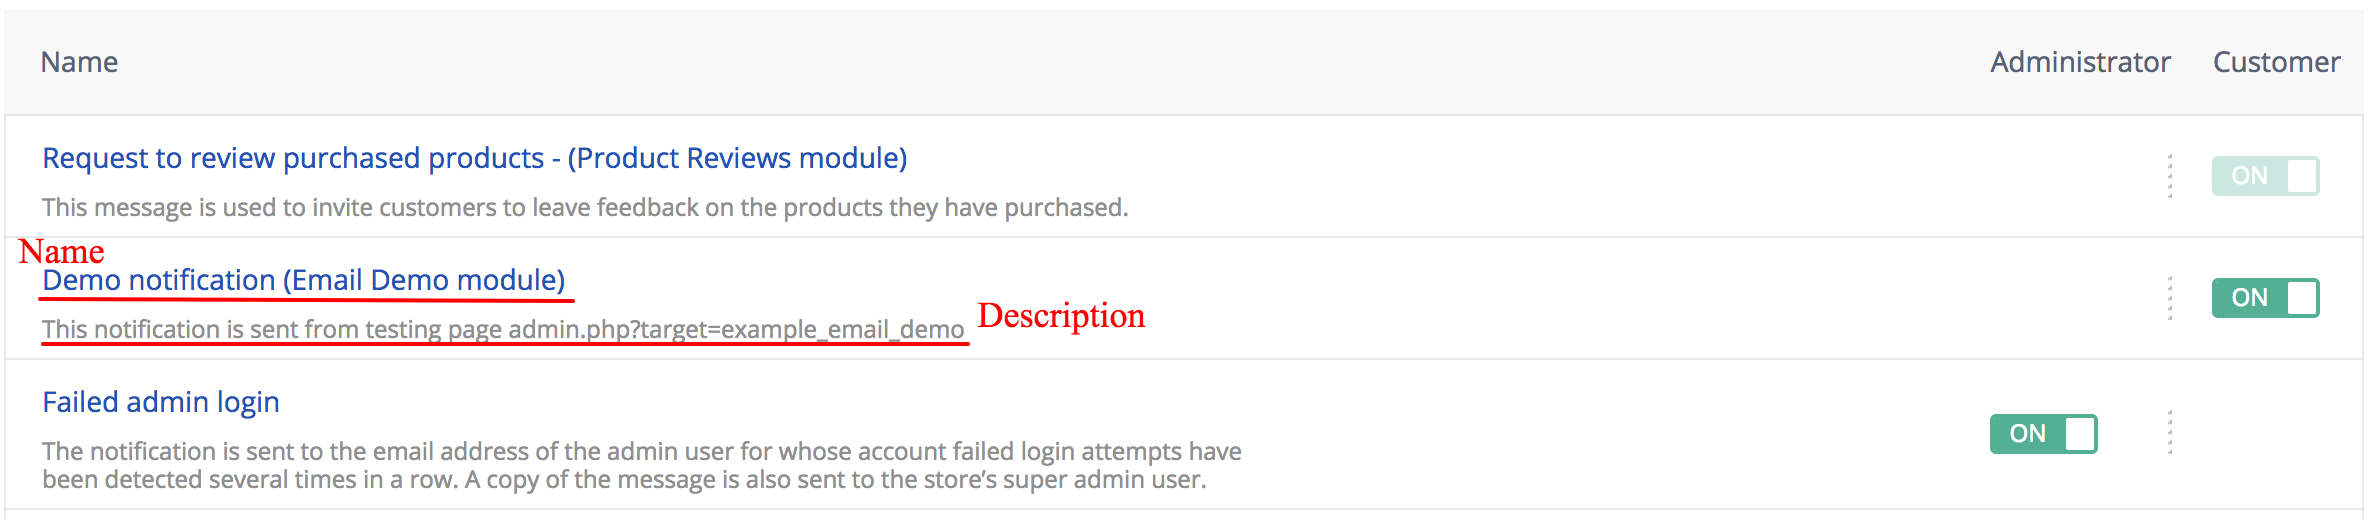
description: This notification is sent ...defines the description of the notifcation when displayed in the notification list (see screenshot above);customerSubjectandcustomerTextdefine subject and main text of the message repsectively. These values will appear on the notification details page like this: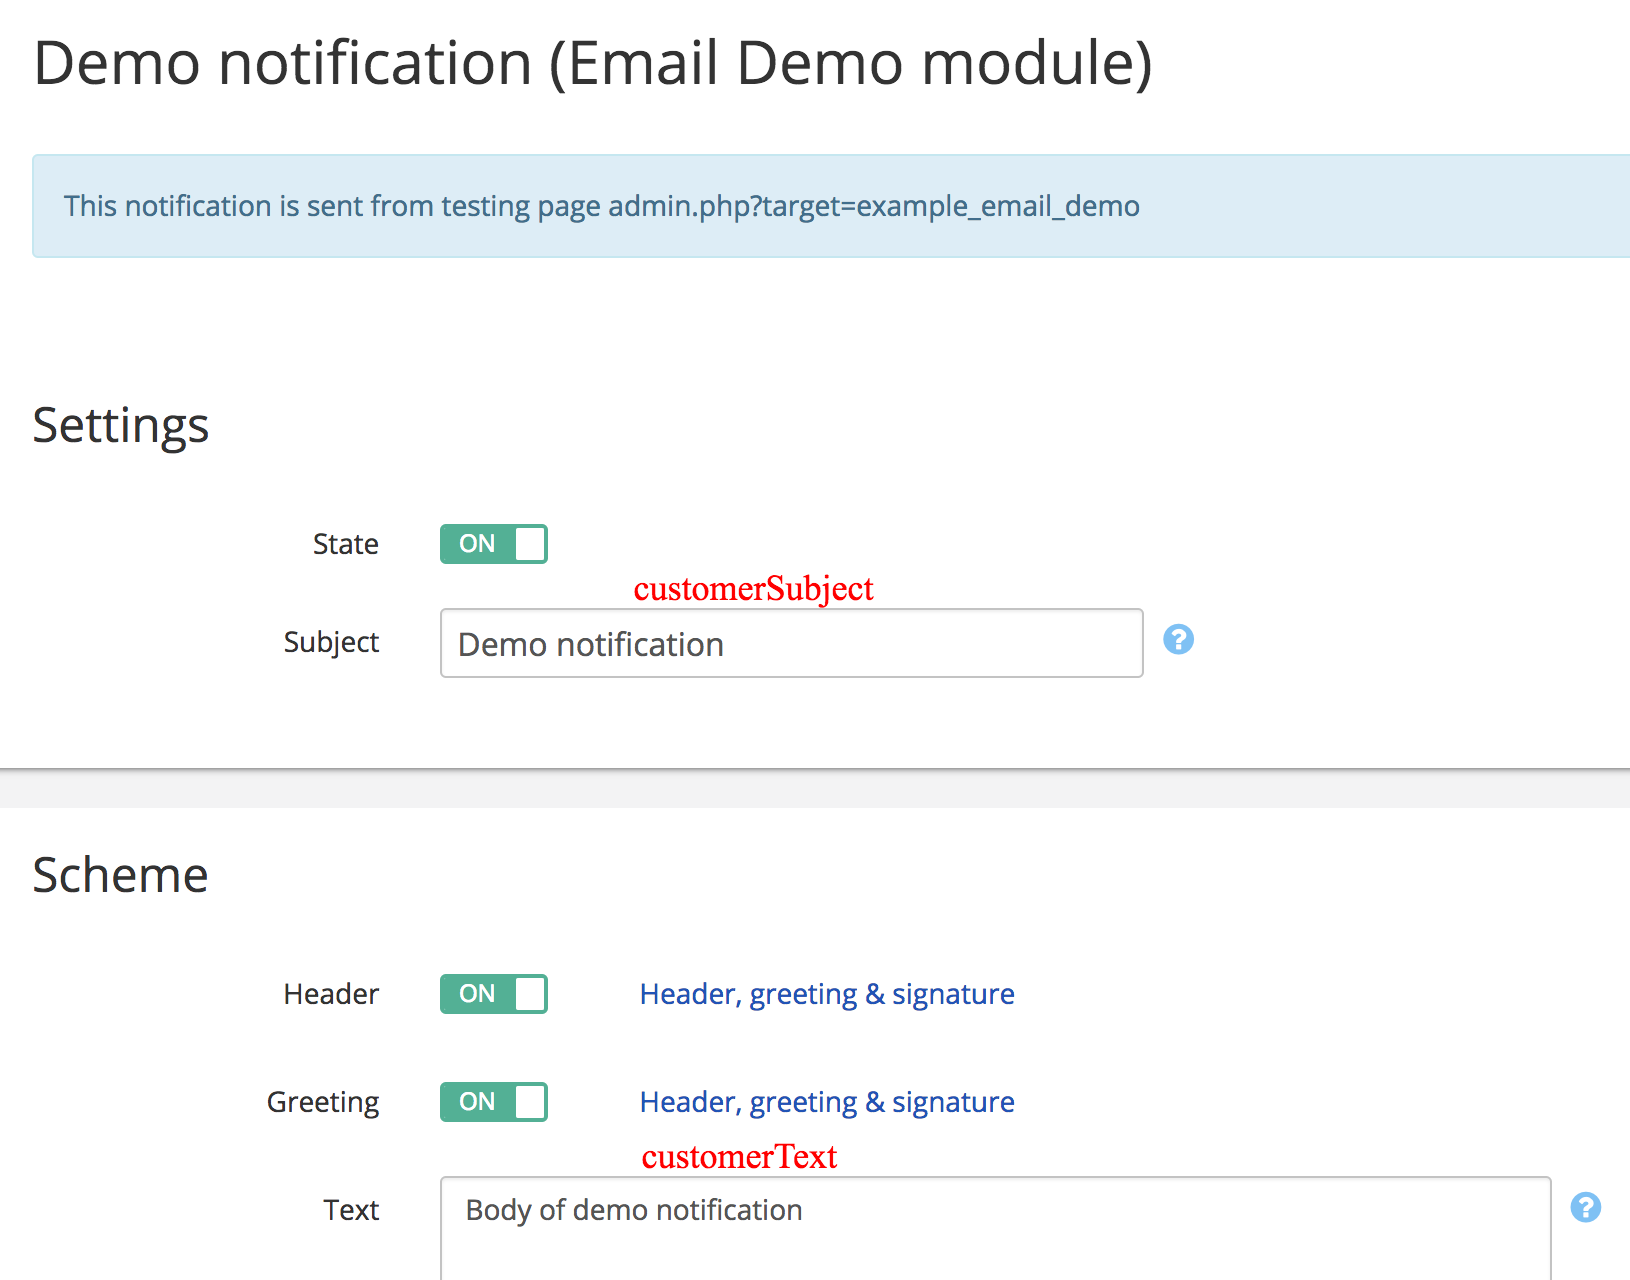
- If your notification is supposed to be sent to admins, you have to have
adminSubjectandadminTextsettings as well. They are the same ascustomerSubjectandcustomerText, but for admin notifications. If you have both customer and admins subjects and texts, you will have the following tab on the notification details page: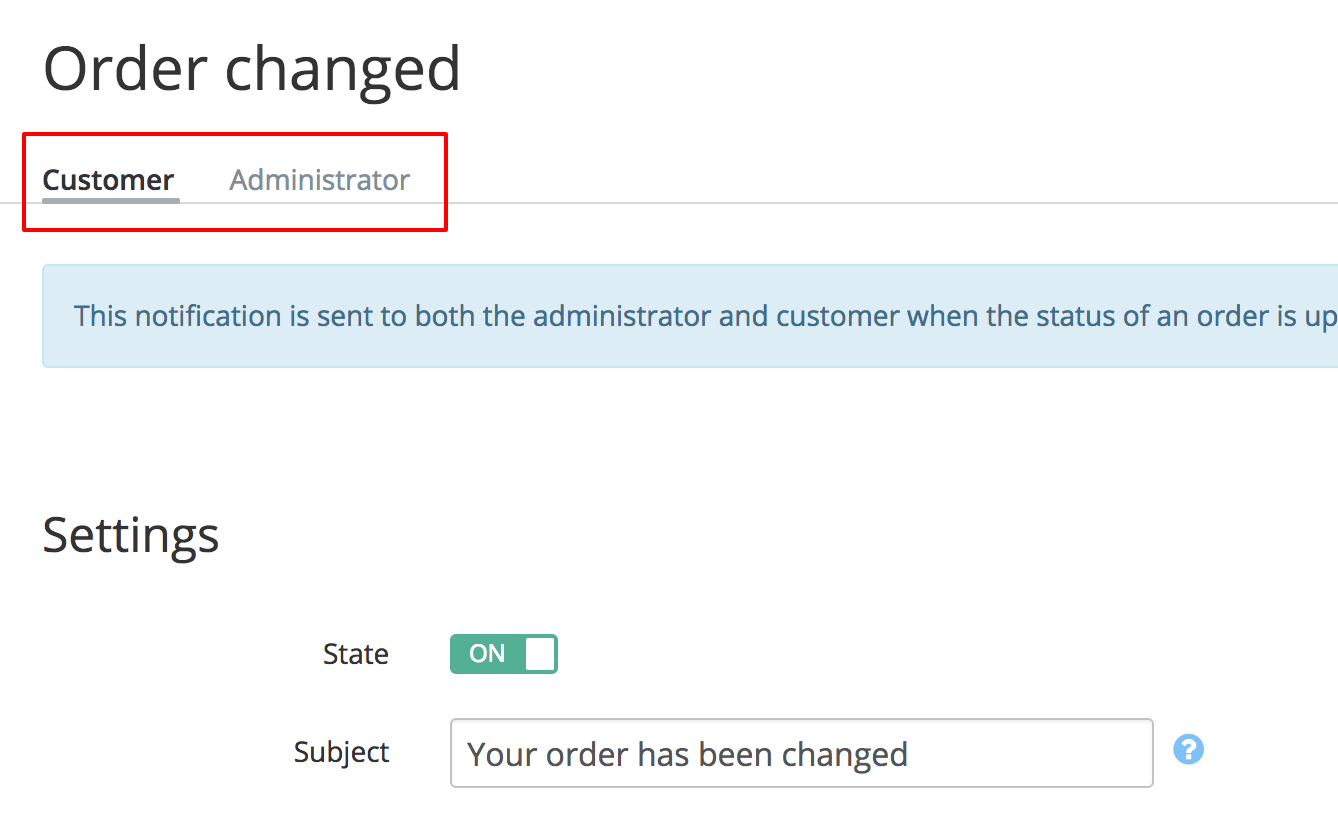
That is it. Once we define such YAML file, we should load it to the system and after that you will see our notification in the 'Store setup > Email notifications > Settings' section.
Now we only need to change our skins/mail/common/modules/XCExample/EmailDemo/message/subject.twig template, so it would pick up subject defined in admin area. For that we define the template's content as follows:
{{ this.getNotificationSubject() }}
We do not need to do anything with email's body, because the text we defined in admin area will be inserted into the email automatically. Also, we no longer need to register 'subject' variable in sendEmailDemoMessage() method, because it is not used anywhere.
Module pack
You can download this module's pack from here: XCExample-EmailDemo-v5_3_0.tar