Introduction
This article describes how developers can change menu items in admin area.
The admin menu is defined by the \XLite\View\Menu\Admin\LeftMenu class (more info about X-Cart classnames) and this guide describes how you can change it.
Implementation
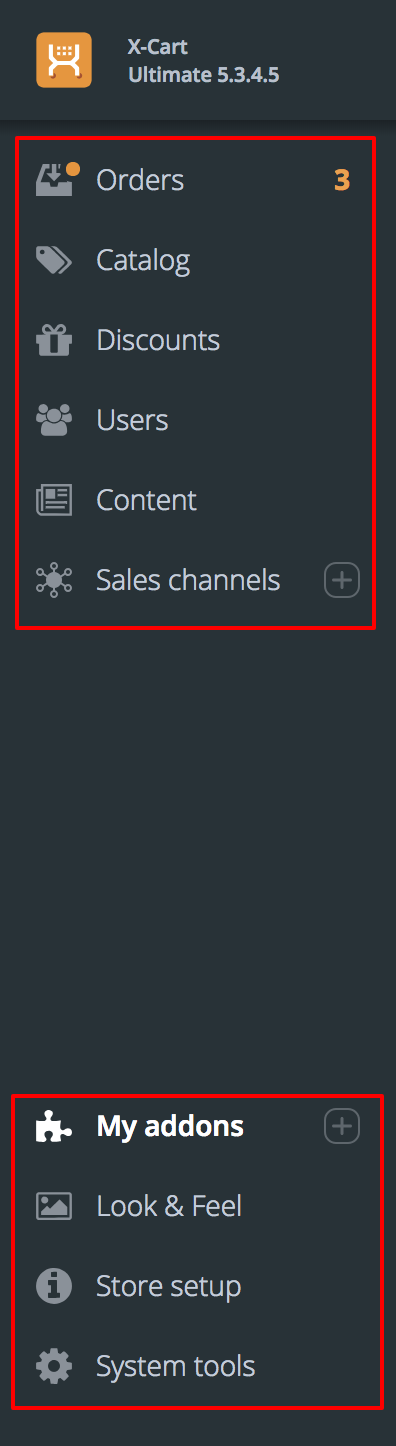
As have been said above, default admin menu is defined by the \XLite\View\Menu\Admin\LeftMenu class. There are main and bottom parts of the menu in admin area:
The main part of the menu is defined by the defineItems() method in the \XLite\View\Menu\Admin\LeftMenu class, while bottom part is defined by the defineBottomItems() method in the same class.
So, if we want to edit the menu, we have to change arrays returned by those methods.
We start off with creating an empty module with developer ID XCExample and module ID AdminMenuDemo.
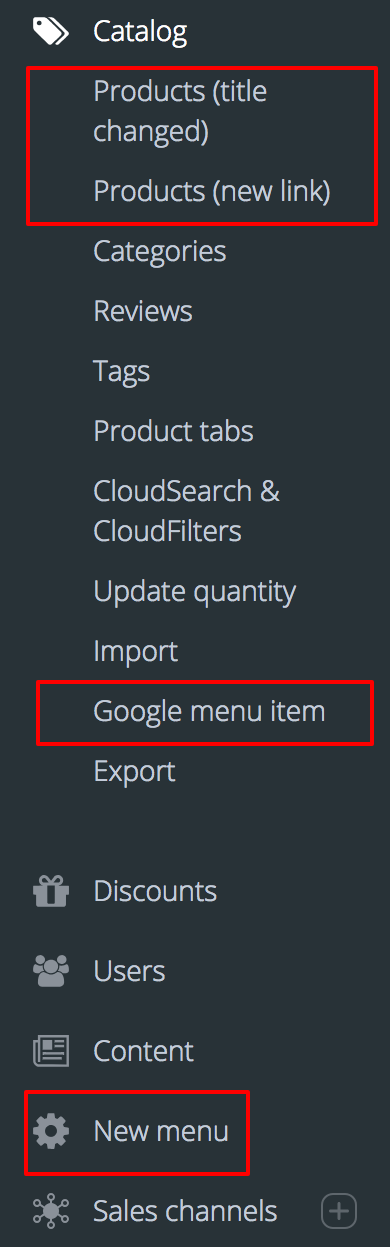
Our task will be to add a new menu item, remove existing one and edit another existing one.
We need to decorate the \XLite\View\Menu\Admin\LeftMenu class, so we create classes/XLite/Module/XCExample/AdminMenuDemo/View/Menu/Admin/LeftMenu.php file with the following content:
<?php

namespace XLite\Module\XCExample\AdminMenuDemo\View\Menu\Admin;

/**
 * Left side menu widget
 */
abstract class LeftMenu extends \XLite\View\Menu\Admin\LeftMenu implements \XLite\Base\IDecorator
{
    protected function defineItems()
    {
        $items = parent::defineItems();

        // creating new item
        // Catalog > Another link to products
        $items['catalog'][self::ITEM_CHILDREN]['extra_product_list'] = array(
            self::ITEM_TITLE  => static::t('Products (new link)'),
            self::ITEM_TARGET => 'product_list',
            self::ITEM_WEIGHT => 250,
        );

        // removing Catalog > Classes & attibutes item
        unset($items['catalog'][self::ITEM_CHILDREN]['product_classes']);

        // changing name of Catalog > Products item to 'New products title'
        $items['catalog'][self::ITEM_CHILDREN]['product_list'][static::ITEM_TITLE] = 'Products (title changed)';

        return $items;
    }
}
Let us have a closer look at each meaningful part of this code. This code works for main menu, but the same principles apply to bottom menu defined by defineBottomItems().
First of all, we call parent's defineItems() in order to get default menu structure and save it into $items variable:
$items = parent::defineItems();
Creating new menu item
We create a new Products (new link) item in Catalog menu like this:
$items['catalog'][self::ITEM_CHILDREN]['extra_product_list'] = array(
    self::ITEM_TITLE  => static::t('Products (new link)'),
    self::ITEM_TARGET => 'product_list',
    self::ITEM_WEIGHT => 250,
);
self::ITEM_TITLEelement defines what label will our menu item have;self::ITEM_TARGETelement defines a page where a user will go after clicking this menu item. If you want to redirect customer to a page outside of X-Cart's admin area, useself::ITEM_LINKelement instead;self::ITEM_WEIGHTelement defines the location of our menu item among others. The greater the value, the lower the menu item will sit.
Example of menu item with link to external page:
$items['catalog'][self::ITEM_CHILDREN]['google'] = array(
    self::ITEM_TITLE  => static::t('Go to Google'),
    self::ITEM_LINK => 'https://google.com',
    self::ITEM_WEIGHT => 500,
);
$items['catalog'] piece ('catalog' to be precise) defines that we create this menu item in Catalog menu. If we want to create items in other menus, then we should use another key in $items array. Here is the reference:
- Orders -
$items['sales']; - Discounts -
$items['promotions']; - Users -
$items['users']; - Content -
$items['content']; - Sales channels -
$items['sales_channels'].
The reference for defineBottomItems() method:
- My addons -
$items['extensions']; - Look & Feel -
$items['css_js']; - Store setup -
$items['store_setup']; - System tools -
$items['system_settings'].
Changing and removing existing menu item
If we want to remove existing menu item, we just remove element representing this item from the $items array:
// removing Catalog > Classes & attibutes item
unset($items['catalog'][self::ITEM_CHILDREN]['product_classes']);
If we want to change existing menu item, we edit it in the same $items array:
// changing name of Catalog > Products item to 'New products title'
$items['catalog'][self::ITEM_CHILDREN]['product_list'][static::ITEM_TITLE] = 'Products (title changed)';
In case you need to re-arrange items in the menu, you should change items' self::ITEM_WEIGHT parameter, instead of re-arranging item positions in $items array.
Creating your own menu
If you want to create your own menu section like 'Catalog' or 'Orders', then you should add this section into $items array like this:
// adding new menu with the most sophisticated title 'New menu'
$items['new_menu'] = [
    static::ITEM_TITLE    => static::t('New menu'),
    static::ITEM_ICON_SVG => 'images/fa-cog.svg',
    static::ITEM_WEIGHT   => 500,
    // static::ITEM_TARGET   => 'product_list',
    self::ITEM_CHILDREN => [
        'new_menu' => [
            self::ITEM_TITLE    => 'Google menu item',
            self::ITEM_LINK     => 'https://google.com',
            self::ITEM_WEIGHT   => 500,
        ],
    ]
];
static::ITEM_TITLE,static::ITEM_WEIGHT,static::ITEM_TARGETelements are the same as for menu items we discussed above;static::ITEM_ICON_SVGelement defines an icon displayed near the menu: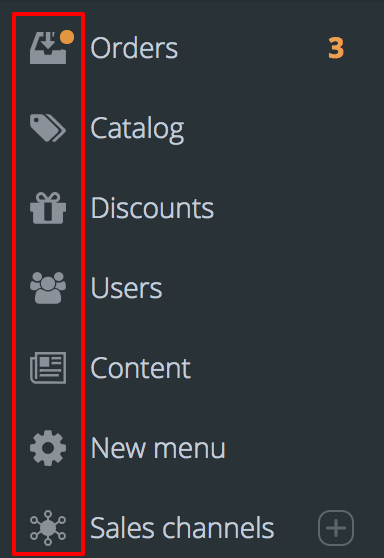
self::ITEM_CHILDRENelement defines menu items in this menu. Each menu item is represented by element we looked at earlier.
We are done with the mod. Reload the page and check the results:
Module pack
You can download this module from here: XCExample-AdminMenuDemo-v5_3_0.tar