Introduction
This article describes the process of creating import/export processes in X-Cart 5. For the sake of example we will show how to add new product field column to export file and how to import values from the same column.
Creating product property
To get started we create a module with developer ID XCExample and module ID ProductExportDemo.
This module adds a new product field called TestField. For that we create the model classes/XLite/Module/XCExample/ProductExportDemo/Model/Product.php file with the following content:
<?php
// vim: set ts=4 sw=4 sts=4 et:

namespace XLite\Module\XCExample\ProductExportDemo\Model;

abstract class Product extends \XLite\Model\Product implements \XLite\Base\IDecorator
{
    /**
     * @Column (type="string")
     */
    protected $testField;

    public function getTestField()
    {
        return $this->testField;
    }

    public function setTestField($value)
    {
        $this->testField = $value;
        return $this;
    }
}
Then class for DTO object, classes/XLite/Module/XCExample/ProductExportDemo/Model/DTO/Product/Info.php:
<?php
// vim: set ts=4 sw=4 sts=4 et:

namespace XLite\Module\XCExample\ProductExportDemo\Model\DTO\Product;

abstract class Info extends \XLite\Model\DTO\Product\Info implements \XLite\Base\IDecorator
{
    protected function init($object)
    {
        parent::init($object);

        $this->default->testField = $object->getTestField();
    }

    public function populateTo($object, $rawData = null)
    {
        parent::populateTo($object, $rawData);

        $object->setTestField((string) $this->default->testField);
    }
}
And class for displaying our newly created field on product details page in admin area, classes/XLite/Module/XCExample/ProductExportDemo/View/FormModel/Product/Info.php:
<?php
// vim: set ts=4 sw=4 sts=4 et:

namespace XLite\Module\XCExample\ProductExportDemo\View\FormModel\Product;

/**
 * Product form model
 */
abstract class Info extends \XLite\View\FormModel\Product\Info implements \XLite\Base\IDecorator
{
    protected function defineFields()
    {
        $schema = parent::defineFields();

        $schema['default']['testField'] = [
            'label'     => static::t('Test field'),
            'position'  => 900,
        ];

        return $schema;
    }
}
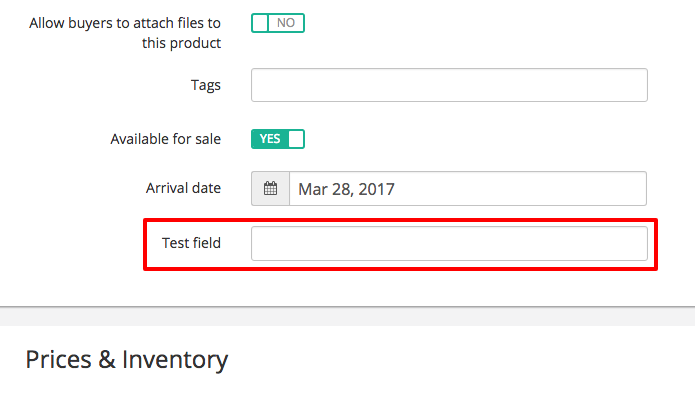
If you go to any product page in admin area at the moment, you should see 'Test Field' property there as follows:
Adding test field to export file
In order to add 'Test Field' to product export file, we should decorate \XLite\Logic\Export\Step\Products class, so we create the classes/XLite/Module/XCExample/ProductExportDemo/Logic/Export/Step/Products.php file with the following content:
<?php
// vim: set ts=4 sw=4 sts=4 et:

namespace XLite\Module\XCExample\ProductExportDemo\Logic\Export\Step;

abstract class Products extends \XLite\Logic\Export\Step\Products implements \XLite\Base\IDecorator
{
    protected function defineColumns()
    {
        $columns = parent::defineColumns();

        $columns['testField'] = array();

        return $columns;
    }

    protected function getTestFieldColumnValue(array $dataset, $name, $i)
    {
        $result = array();

        $result[] = $dataset['model']->getTestField();

        return $result;
    }
}
defineColumns()method is used to add 'testField' column to export file. The name of the column can be whatever you want and must not be the same as product property, however we keep names the same for the consistency;getTestFieldColumnValue()is used to pull the actual value for the column. Note that the name of the method isget<COLUMN-NAME>ColumnValue(), where<COLUMN-NAME>is the name of the column we defined indefineColumns()method.$nameargument of the method holds the name of the column (testField in our case), while$iargument is the number of line being processed in export file.
Sometimes, you want to process value of the property, so it would have specific format in export file. For instance, if we exported some boolean property, we would do it like this:
$result[] = $this->formatBoolean($dataset['model']->getTestField());
in order to have Yes or No values in export file rather than 1 or 0.
Other formatting options are:
- formatArray();
- formatObject();
- formatTimestamp();
- etc
The full list of all pre-defined formats can be found in \XLite\Logic\Export\Step\AStep class.
Updating import routine
Now we need to tell import process how 'testField' column should be taken care of. For that we should decorate \XLite\Logic\Import\Processor\Products class, so we create the classes/XLite/Module/XCExample/ProductExportDemo/Logic/Import/Processor/Products.php class with the following content:
<?php
// vim: set ts=4 sw=4 sts=4 et:

namespace XLite\Module\XCExample\ProductExportDemo\Logic\Import\Processor;

/**
 * Products import processor
 */
abstract class Products extends \XLite\Logic\Import\Processor\Products implements \XLite\Base\IDecorator
{
    protected function defineColumns()
    {
        $columns = parent::defineColumns();

        $columns['testField'] = array();

        return $columns;
    }

    protected function importTestFieldColumn(\XLite\Model\Product $model, $value, array $column)
    {
        $model->setTestField($this->normalizeValueAsString($value));
    }
}
defineColumns()is the method very similar to one in export class and it just defines what columns should be processed by import;importTestFieldColumn()is also method similar to one in export class, except it defines what is going to happen when import reaches our 'testField' column. Instead of pulling value for a column, it saves the value back to the object. Note that the name of the method has the same structure:import<COLUMN-NAME>Column(), so if we want to process, say, 'globalMessage' field, we would haveimportGlobalMessageColumn()method.
Again, you almost always want to pre-process values from import file, so there are number of methods for your disposal:
- normalizeValueAsString() to prepare a string;
- normalizeValueAsBoolean() to convert from Yes/No to 1/0;
- normalizeValueAsUinteger() and normalizeValueAsUinteger();
There are also more complex formattig options:
- normalizeValueAsEmail();
- normalizeValueAsDate();
- normalizeValueAsURL();
- normalizeValueAsCurrency();
- etc
All pre-defined formatting options can be found in \XLite\Logic\Import\Processor\AProcessor class.
What if I want to add property to other object types
If you want to add property to import/export of categories, users etc, then the process will be the same but you need to decorate different files.
- Categories:
\XLite\Logic\Export\Step\Categoriesand\XLite\Logic\Import\Processor\Categories; - Users:
\XLite\Logic\Export\Step\Usersand\XLite\Logic\Import\Processor\Customers; - Orders:
\XLite\Logic\Export\Step\Orders; since you cannot import orders into X-Cart you can only alter export process of orders.
Checking the results and module pack
That is it for the module. Now you can try to go to admin area, pick a product and define its 'Test Field' property as you want. Then, export this product and make sure that the 'testField' column has the same value. After that, define a new value for this column and import the file back. 'Test Field' property should be updated accordingly.
You can download the pack of this module from here: XCExample-ProductExportDemo-v5_3_0.tar