Introduction
This article describes how developers can create new entity in X-Cart store. This article's example is how to create quick messages (they are our new entities) that can be created in admin area and then 3 latest active ones will be shown in the storefront.
Creating module and page
First of all we create an empty module with developer ID XCExample and module ID NewEntityDemo. In this module, we create a page target=quick_messages in admin area. We create:
empty controller class
\XLite\Module\XCExample\NewEntityDemo\Controller\Admin\QuickMessagesviewer class
\XLite\Module\XCExample\NewEntityDemo\View\Page\Admin\QuickMessagesPagewith the following content:<?php
namespace XLite\Module\XCExample\NewEntityDemo\View\Page\Admin;
/**
* QuickMessagesPage
*
* @ListChild (list="admin.center", zone="admin")
*/
class QuickMessagesPage extends \XLite\View\AView
{
/**
* Return list of allowed targets
*/
public static function getAllowedTargets()
{
return array_merge(parent::getAllowedTargets(), array('quick_messages'));
}
/**
* Return widget default template
*/
public function getDefaultTemplate()
{
return 'modules/XCExample/NewEntityDemo/page/quick_messages/body.twig';
}
}empty template
skins/admin/modules/XCExample/NewEntityDemo/page/quick_messages/body.twig.
Creating Quick Message entity
In order to create a new entity in X-Cart, we have to create a new Model class. We create classes/XLite/Module/XCExample/NewEntityDemo/Model/QuickMessage.php file with the following content:
<?php

namespace XLite\Module\XCExample\NewEntityDemo\Model;

/**
 * @Entity
 * @Table (name="quick_messages")
 */

class QuickMessage extends \XLite\Model\AEntity
{
    /**
     * @Id
     * @GeneratedValue (strategy="AUTO")
     * @Column         (type="integer")
     */
    protected $id;

    /**
     * @Column (type="boolean")
     */
    protected $enabled = true;

    /**
     * @Column (type="text")
     */
    protected $body = '';

    public function getId()
    {
        return $this->id;
    }

    public function getEnabled()
    {
        return $this->enabled;
    }

    public function setEnabled($value)
    {
        $this->enabled = $value;
        return $this;
    }

    public function getBody()
    {
        return $this->body;
    }

    public function setBody($value)
    {
        $this->body = $value;
        return $this;
    }
}
Let us have a close look at this class implementation:
We mark that this class describes a new entity by adding directive:
@EntityWe also specify a table name where records about these entities will be stored:
@Table (name="quick_messages")Since our entity is the most basic one we use
\XLite\Model\AEntityclass as its template:class QuickMessage extends \XLite\Model\AEntityNext, we specify each property of this class. We start with
$id:/**
* @Id
* @GeneratedValue (strategy="AUTO")
* @Column         (type="integer")
*/
protected $id;which is marked as ID:
@IdIt is also marked as auto-generated integer value:
* @GeneratedValue (strategy="AUTO")
* @Column (type="integer")Our QuickMessage class will also have
$enabledproperty, which will define whether quick message is active or not:/**
* @Column (type="boolean")
*/
protected $enabled = true;As you can see, type of this property is
boolean.Finally, we will have a
$bodyproperty that will define text of quick message:/**
* @Column (type="text")
*/
protected $body = '';To finish this class, we create standard accessor methods:
getId(),getEnabled(),setEnabled(),getBody(),setBody().
We have created the model class and now we need to create repository class for QuickMessage entity. Repository class is used to pull entities' info from the database. We just create the \XLite\Module\XCExample\NewEntityDemo\Model\Repo\QuickMessage class with the following content:
<?php

namespace XLite\Module\XCExample\NewEntityDemo\Model\Repo;

class QuickMessage extends \XLite\Model\Repo\ARepo
{
}
After creating Model and Repository classes, we are done with creating entity classes.
Creating interface for editing Quick Messages in admin area
Now it is time to add a form where you can create, edit and delete quick messages and display this form on target=quick_messages page.
ItemsList is such form that displays info about entities in the structured format and it should produce a result similar to the snapshot below:
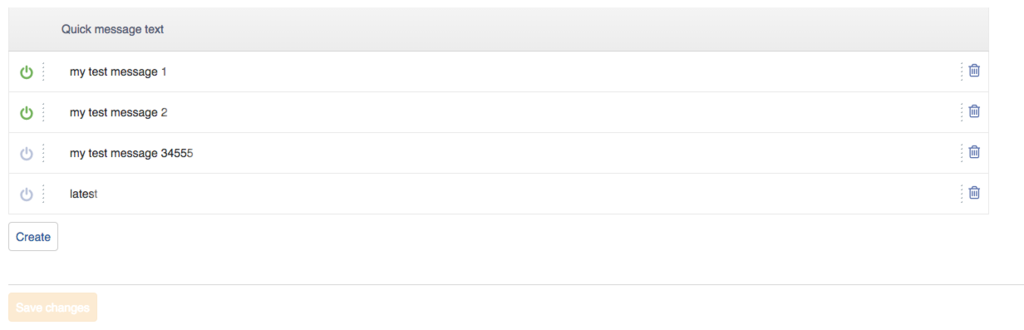
As you may have noticed, admin area of X-Cart is full of similar ItemsLists. Moreover, product and category lists in storefront are ItemsLists too, even though they look a bit differently.
In order to create an ItemsList for quick messages, we create the classes/XLite/Module/XCExample/NewEntityDemo/View/ItemsList/Model/QuickMessage.php file with the following content:
<?php

namespace XLite\Module\XCExample\NewEntityDemo\View\ItemsList\Model;

class QuickMessage extends \XLite\View\ItemsList\Model\Table
{
    protected function defineColumns()
    {
        return array(
            'body' => array(
                static::COLUMN_CLASS    => 'XLite\View\FormField\Inline\Input\Text',
                static::COLUMN_NAME     => static::t('Quick message text'),
                static::COLUMN_ORDERBY  => 100,
            ),

        );
    }

    protected function defineRepositoryName()
    {
        return 'XLite\Module\XCExample\NewEntityDemo\Model\QuickMessage';
    }

    protected function isSwitchable()
    {
        return true;
    }

    protected function isRemoved()
    {
        return true;
    }

    protected function isInlineCreation()
    {
        return static::CREATE_INLINE_BOTTOM;
    }

    protected function getCreateURL()
    {
        return \XLite\Core\Converter::buildUrl('quick_messages');
    }

    protected function wrapWithFormByDefault()
    {
        return true;
    }

    protected function getFormTarget()
    {
        return 'quick_messages';
    }
}
Our ItemsList widget is basic that is why we extend the
\XLite\View\ItemsList\Model\Tableclass:class QuickMessage extends \XLite\View\ItemsList\Model\TableThis class defines the basic look of ItemsList similar to other ones in admin area.
We define what entities must be displayed in this ItemList:
protected function defineRepositoryName()
{
    return 'XLite\Module\XCExample\NewEntityDemo\Model\QuickMessage';
}In our case, we should display our quick messages defined by
\XLite\Module\XCExample\NewEntityDemo\Model\QuickMessagemodel.Then, we define that our ItemsList must display enable/disable icon –
isSwitchable()method – and bucket icon to remove an entity –isRemoved()method:protected function isSwitchable()
{
return true;
}
protected function isRemoved()
{
return true;
}isSwitchable()method uses$enabledproperty in the model class in order to mark an entity either active or disabled.Next, we define which model properties must be displayed in the ItemsList. In our case, we only want to display body column there:
protected function defineColumns()
{
    return array(
        'body' => array(
            static::COLUMN_CLASS => 'XLite\View\FormField\Inline\Input\Text',
            static::COLUMN_NAME => static::t('Quick message text'),
            static::COLUMN_ORDERBY => 100,
        ),
    );
}Value from the
COLUMN_NAMEelement will be displayed in the header of ItemsList. Key of the array – body, in our case – defines the property of object we will work with. We will pull a value from it when rendering a form and we will save a new value into it.We need to add a button for creating new entities and this button should be placed at the bottom of the ItemsList:
protected function isInlineCreation()
{
    return static::CREATE_INLINE_BOTTOM;
}

protected function getCreateURL()
{
    return \XLite\Core\Converter::buildUrl('quick_messages');
}Finally, we define that our ItemsList has a form around it. It will allow us to submit requests to create new records and change existing ones.
protected function wrapWithFormByDefault()
{
    return true;
}

protected function getFormTarget()
{
    return 'quick_messages';
}getFormTarget()defines what target we will be submitting our form to. We specify the target of the page we created.
Now let us add this ItemsList to the admin.php?target=quick_messages page. We go to the skins/admin/modules/XCExample/NewEntityDemo/page/quick_messages/body.twig template and specify the following code there:
{{ widget('\\XLite\\Module\\XCExample\\NewEntityDemo\\View\\ItemsList\\Model\\QuickMessage') }}
We just call for our ItemsList widget here.
Checking intermittent results
Now we are done with the admin part of this mod and we can create quick messages in admin area. Go to admin.php?target=quick_messages page and you should see the following result:
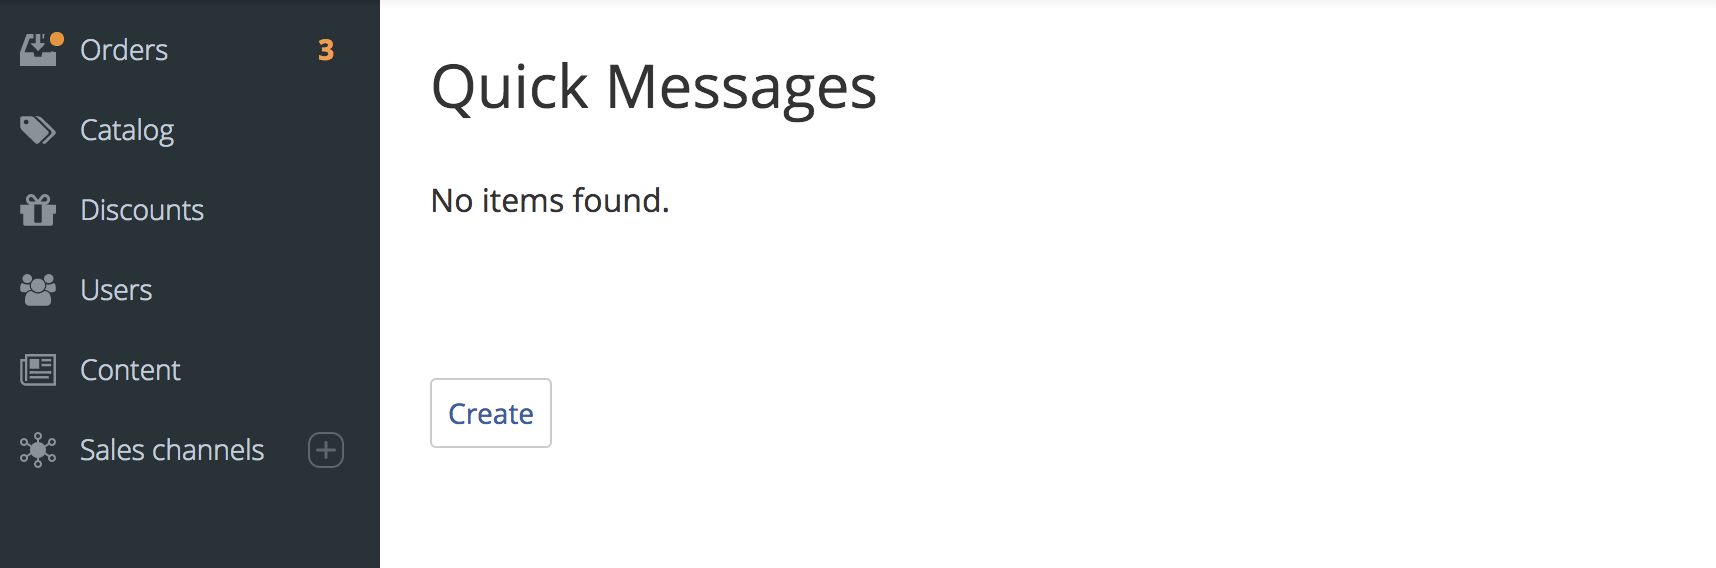
Of course, we do not have any quick messages yet, but if you click Create button, you can create some:

Once you add some quick messages, do not forget to save results by clicking Save changes button.
Showing quick messages in customer area
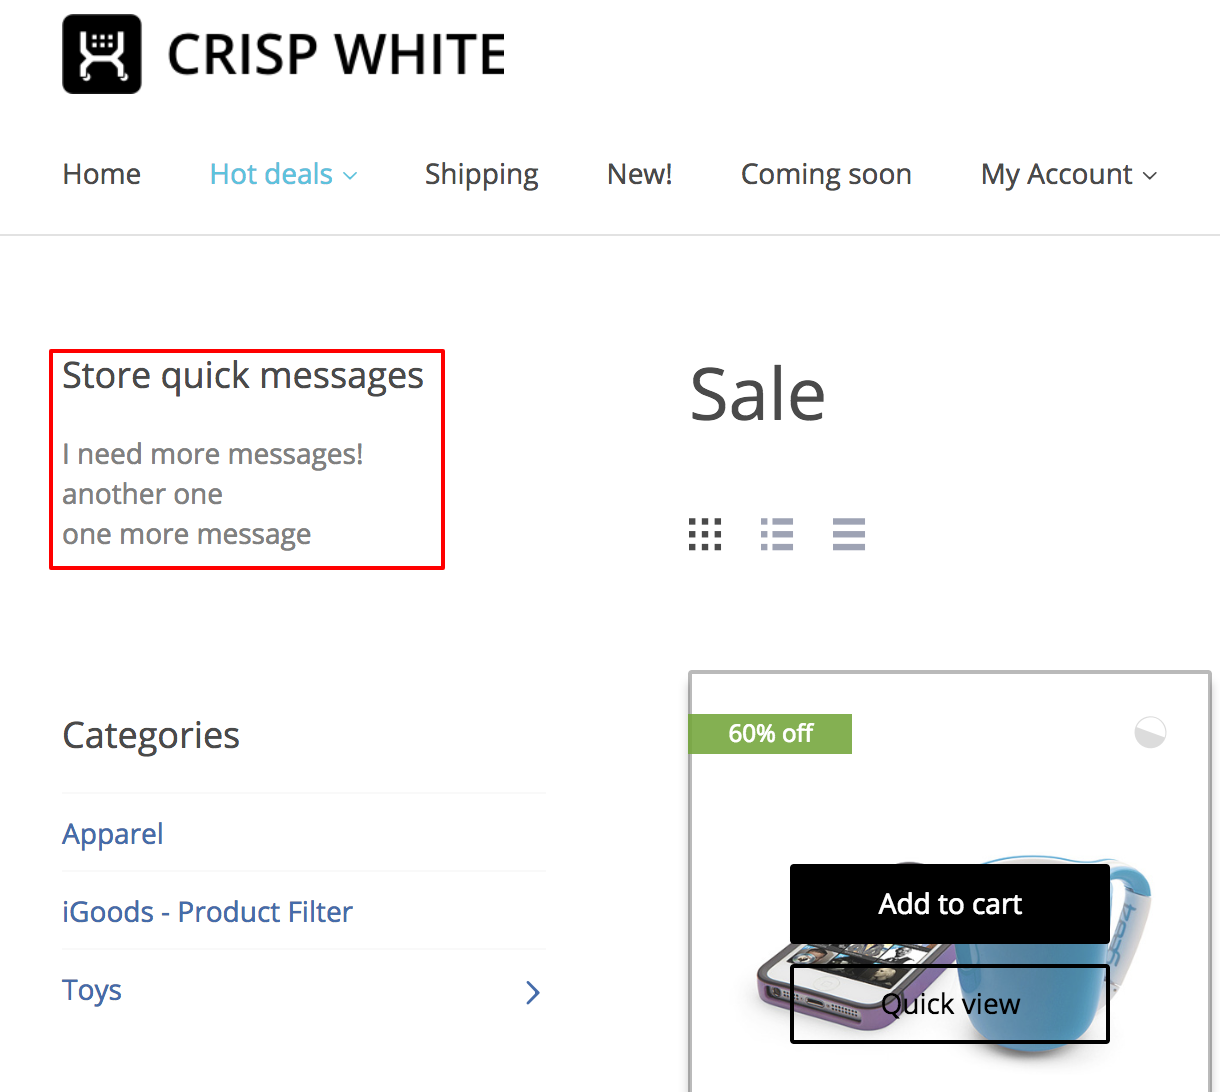
We will show three latest quick messages in sidebar box in the left-hand side menu in storefront.
First, we create the viewer class for our menu. We create the classes/XLite/Module/XCExample/NewEntityDemo/View/QuickMessageMenu.php file with the following content:
<?php

namespace XLite\Module\XCExample\NewEntityDemo\View;

/**
 * @ListChild (list="sidebar.first", zone="customer", weight="10")
 */

class QuickMessageMenu extends \XLite\View\SideBarBox
{
    protected function getHead()
    {
        return 'Store quick messages';
    }

    protected function getDir()
    {
        return 'modules/XCExample/NewEntityDemo/quickmessage';
    }

    protected function getMessages()
    {
        $return = \XLite\Core\Database::getRepo('\XLite\Module\XCExample\NewEntityDemo\Model\QuickMessage')->findNewest();

        return $return;
    }
}
The implementation is very similar to one showed in the basic guide of creating sidebar menu in storefront, but there is also getMessages() method. This method is aimed to pull three latest quick messages from the database. However, findNewest() method does not exist in our \XLite\Module\XCExample\NewEntityDemo\Model\Repo\QuickMessage class yet and we have to create it.
We go to the classes/XLite/Module/XCExample/NewEntityDemo/Model/Repo/QuickMessage.php file and add one more method there:
public function findNewest()
{
    return $this->createQueryBuilder('a')
        ->andWhere('a.enabled = 1')
        ->addOrderBy('a.id', 'DESC')
        ->setFirstResult(0)
        ->setMaxResults(3)
        ->getResult();
}
Finally, we have to create the folder that was mentioned in our viewer class - modules/XCExample/NewEntityDemo/quickmessage – so we create skins/default/en/modules/XCExample/NewEntityDemo/quickmessage/ folder with the body.twig template inside it. The content of this template is as follows:
{% if this.getMessages() %}
    <ul class="menu menu-list messages">
        {% for message in this.getMessages() %}
            <li>{{ message.body }}</li>
        {% endfor %}
    </ul>
{% endif %}
This code can be read as follows. If there are quick messages – {% if this.getMessages() %} – then we create <ul> element and walk through each element returned by getMessages() method - {% for message in this.getMessages() %} – displaying text of each quick message inside <li> element – <li>{{ message.body }}</li>.
Checking the final results
We are done with this mod and we have to re-deploy the store one more time. If you have any active quick messages in admin area, you will see the following result in the storefront:
Module pack
You can download the code of this module here: XCExample-NewEntityDemo-v5_3_0.tar